
"God
said take what you want...and pay for it."
Stephen King, "Desperation"

Personal works have this certain advantage (and disadvantage) that the subject is absolutely unrestricted. I decided to do something which I do not very often (though sometimes it happens ) which is adding a human figure to my landscapes. The idea evolved from a forest nymph flying over swamps to a priestess in ruins of a half-flooded shrine. At the last moment I decided to deprive of consciousness the main (and the only) character to make the scene little more intriguing .
Rysunki personalne mają tą zaletę (a zarazem wadę), że ich
tematyka jest absolutnie dowolna. Postanowiłam więc zrobić coś, co nieczęsto mi
się zdarza (chociaż się zdarza!) - wpleść do moich krajobrazów ludzką postać.
Pomysł ewoluował długo i mozolnie od przedstawienia leśnej nimfy nad mokradłem
do kapłanki w ruinach na wpół zatopionej świątyni. Żeby ilustracja była nieco
bardziej intrygująca, niemal w ostatniej chwili postanowiłam pozbawić
przytomności główną (i w sumie jedyną) bohaterkę tej sceny.
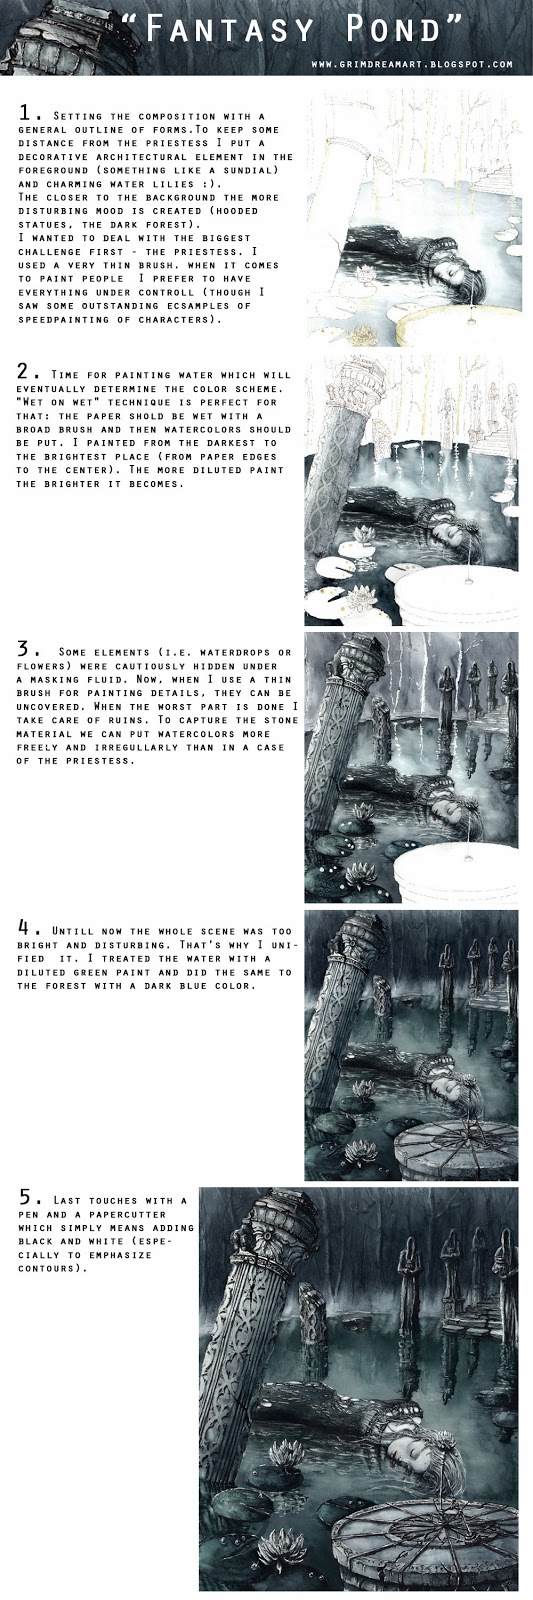
1. Setting the composition with sketching a general outline of
forms.To keep some distance from the priestess I put a decorative architectural
element in the foreground (something like a sundial) and charming water lilies
:). The closer to the background the more disturbing mood is created (hooded statues,
the dark forest).
I wanted to deal with the biggest challenge first which was
the priestess itself. In case something would go wrong, I could start drawing
one more time without wasting too much time.
1. Ustawienie kompozycji za pomocą ogólnego zarysu brył. Żeby
nabrać nieco dystansu do bohaterki, umieściłam na pierwszym planie ozdobny
element architektoniczny (coś na kształt zegara słonecznego) oraz urocze lilie
wodne :) Im dalszy plan, tym niepokój bardziej narasta (zakapturzone posągi i
ciemny las).
Postanowiłam na samym początku zmierzyć się z największym
wyzwaniem - kapłanką. Gdyby coś poszło niezgodnie z planem, mogłabym rozpocząć
rysunek od początku, nie tracąc zbyt wiele czasu.

2. Time for painting water which will eventually determine the
color scheme. "Wet on wet" technique is perfect for that: the paper
should be wet with a broad brush and then watercolors should be put. I painted from the darkest to the brightest
place (from the paper edges to the center). The more diluted watercolor paint the brighter color becomes.
2. Czas na wodę, która ostatecznie zdeterminuje całą
kolorystykę. Technika "mokre na mokrym" polega na zmoczeniu kartki czystą wodą za pomocą szerokiego pędzla. Akwarela
jest nakładana od najciemniejszego do najjaśniejszego miejsca, czyli w tym
wypadku od brzegów kartki do środka. Rozjaśnienie uzyskuje się dzięki
stopniowemu dodawaniu coraz większych ilości wody do akwareli.

3. Some elements (i.e. waterdrops or flowers) were cautiously
hidden under a masking fluid. Now, when I use a thin brush for painting
details, they can be uncovered. When the worst part is done I can breathe a
sigh of relief and take care of ruins. To capture the stone material we can put
watercolors more freely and irregullarly than in case of the priestess.
3. Pewne elementy (np. krople wody czy kwiaty) zostały
przezornie zakryte płynem maskującym. Teraz, kiedy przerzucam się na malowanie
detali drobnym pędzlem, mogą zostać odsłonięte. Kiedy najgorsze jest już zrobione,
można odetchnąć z ulgą i zająć się ruinami. Żeby oddać strukturę kamienia można malować znacznie bardziej swobodnie nakładając farbę w bardziej nieregularny sposób niż w przypadku kapłanki.

4. Untill now the whole scene was too bright and disturbing.
That's why I unified it. I treated the
water with a diluted green paint and did the same to the forest with
a dark blue color.
4. Do tej pory cała scena była zbyt jasna i rozpraszająca, dla tego postawiłam ją ujednolicić, aby uwaga skupiała się na
najistotniejszych elementach. W tym celu dość rozwodnioną zieloną akwarelką
potraktowałam całą powierzchnię wody, natomiast granatową - las w tle.

5. Last touches with a pen and a papercutter which simply means
adding black and white (especially to emphasize contours).
5. Ostatnie szlify piórkiem i nożykiem do papieru, czyli
punktowe dodanie czerni i bieli (szczególnie po to, żeby podkreślić kontury).

And here's a downloadable tutorial (after downloading it's much bigger of course :) ):
No comments:
Post a Comment